

What Service Does Reddit Use To Send Emails For Their Application?

![]()
Sending Emails Securely Using Node.js, Nodemailer, SMTP, Gmail, and OAuth2
Many solutions online regarding configuring Nodemailer to use your Gmail requires you to enable less secure app access. If that sounds too scary for yous, then y'all have come up to the right place! In this article, you volition learn how to securely configure Nodemailer and Gmail.
Let's start by understanding what Nodemailer is.
Nodemailer is a module that makes sending emails from Node.js applications ridiculously like shooting fish in a barrel.
The following are the main steps required to send emails:
- Creating a transporter (object used to transport emails) using either SMTP or some other transport mechanism
- Setting upwardly message options (who sends what to whom)
- Sending the e-mail by calling sendMail method on the transporter
Less Secure Configuration
Before nosotros look at the secure solution for configuring Nodemailer and Gmail, let's look at the less secure solution.
Using the steps above every bit a reference, hither is the corresponding code:
//Step 1: Creating the transporter const transporter = nodemailer.createTransport({ service: "Gmail", auth: { user: "******@gmail.com", pass: "gmail_password" } }); //Step 2: Setting up bulletin options const messageOptions = { subject: "Test", text: "I am sending an email from nodemailer!", to: "put_email_of_the_recipient", from: "put_email_of_sender" }; //Step iii: Sending e-mail transporter.sendMail(messageOptions);
Notation: the solution to a higher place won't work until you enable less secure app access in Google account settings.
Now, allow's await at the more than secure solution.
Pace i: Creating a Google Project
Visit Google Developer Console to create a projection. A project is needed so that nosotros can create the necessary API credentials.
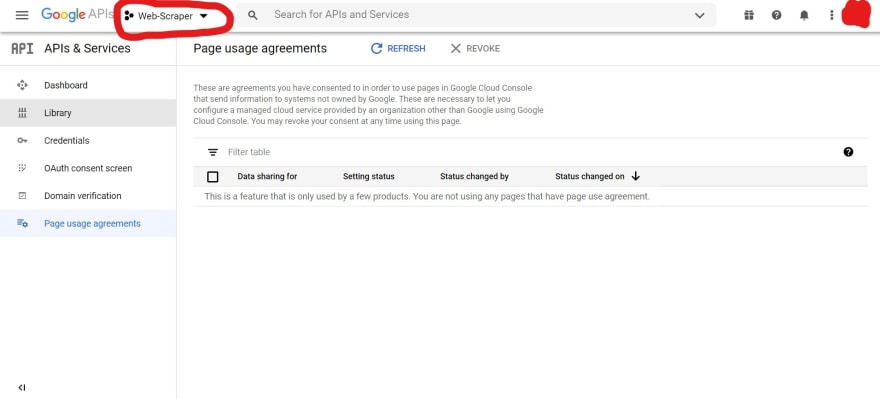
One time in the panel, click the dropdown in the top left corner.
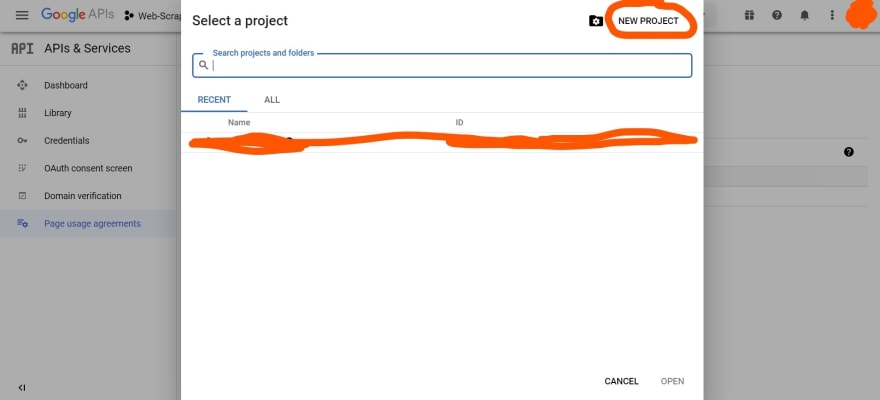
Subsequently the create project window loads, click New Project.
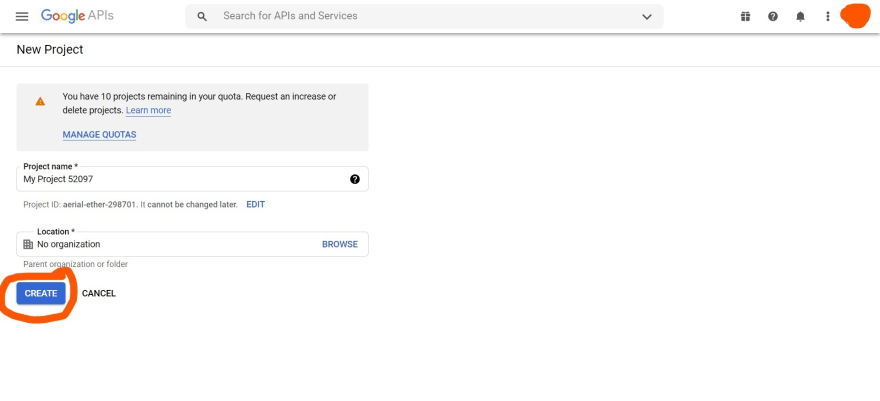
Enter in the project name and click create.
Step 2: Creating OAuth ii.0 API Credentials
To get the client secret and client id, we need to create OAuth credentials. A client id identifies our app to Google'southward OAuth servers so that nosotros can securely transport emails from Nodemailer.
Outset past selecting credentials in the sidebar on the left. In one case selected, the post-obit screen should announced:
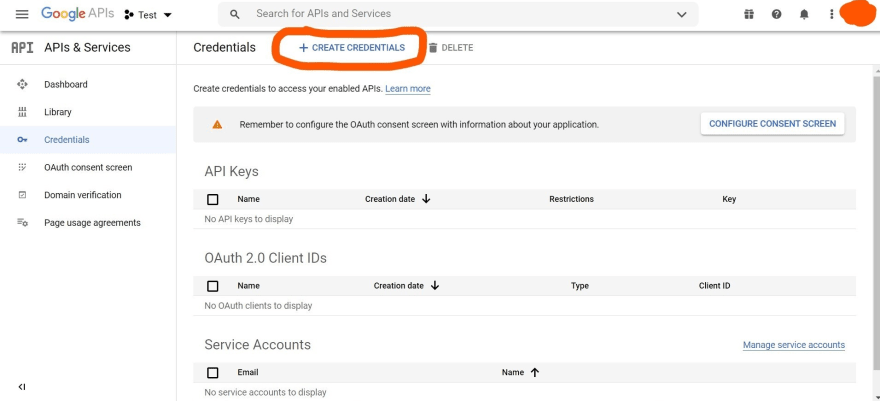
After clicking create credentials, a dropdown will appear. In the dropdown, select OAuth client ID.

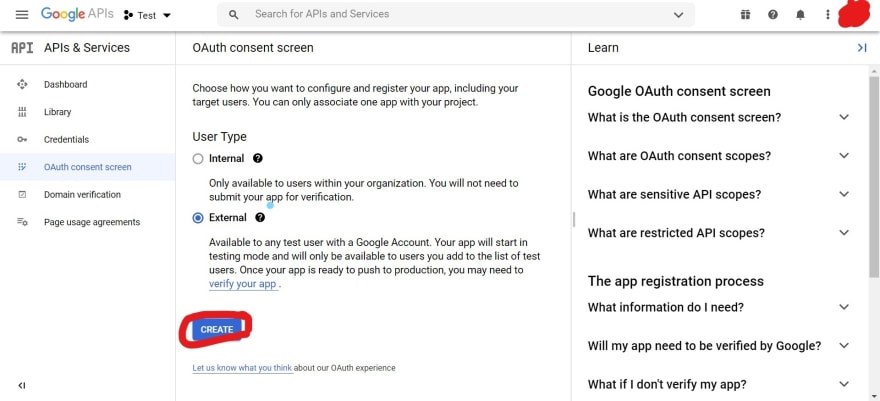
Earlier proceeding, nosotros need to configure the consent screen. The consent screen configuration is important when an application offers Google Sign In. Nevertheless, information technology must be completed and then we tin can create a customer id and clandestine.
Click configure consent screen.

Select external for the User Type and and then click create.
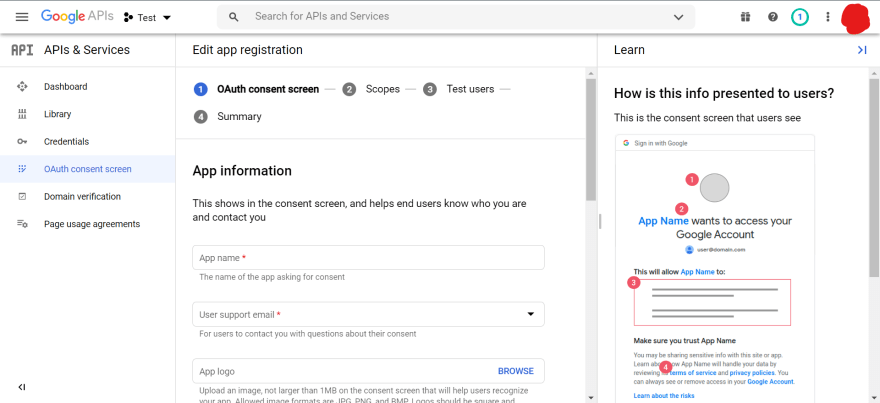
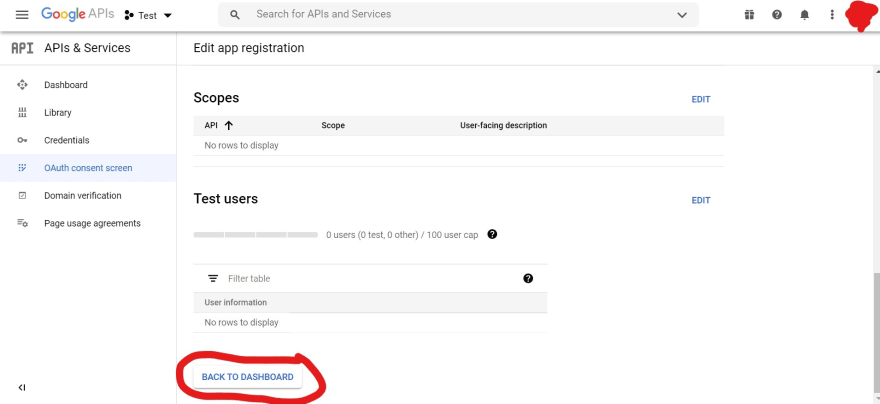
Subsequently the multi-step form appears, fill out the required fields for each step.
Once on the last step, click dorsum to dashboard.
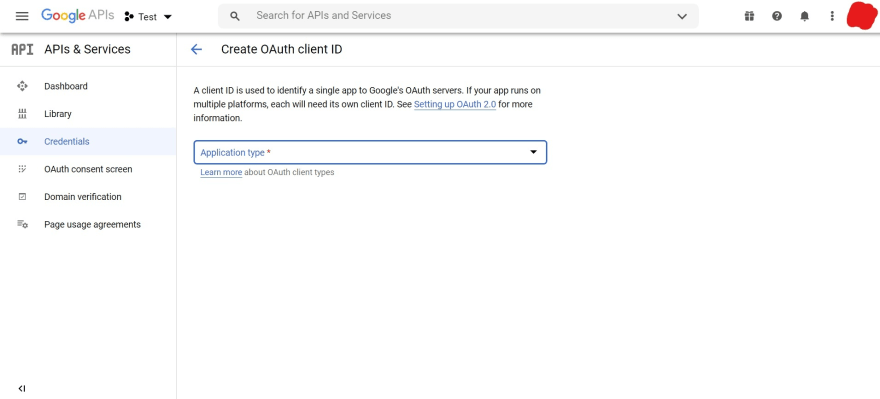
Go back to the Create OAuth client ID screen (page with the configure consent screen push). If the consent screen has been configured successfully, an application type dropdown should appear. Select Web application and fill up in the required field(south).
In the Authorized redirect URIs department, make sure to add https://developers.google.com/oauthplayground.
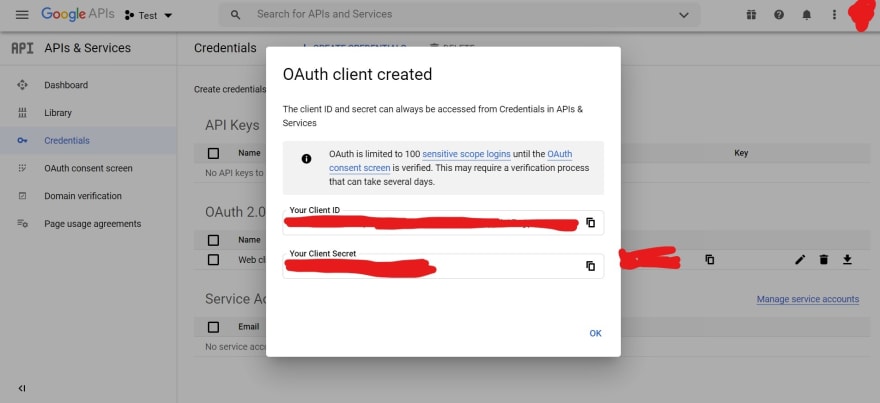
Now click create!
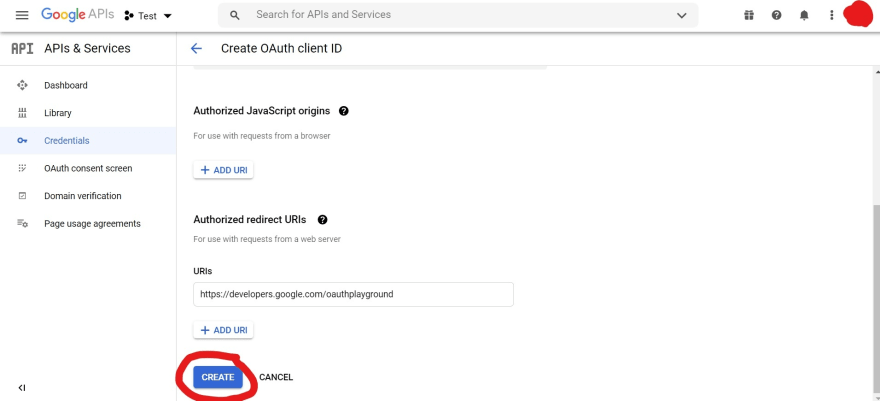
Copy the customer ID and client secret shown on the screen and relieve it for later.
Stride iii: OAuth two.0 Playground
We also demand a refresh token and admission token which can be generated from the customer id and secret.
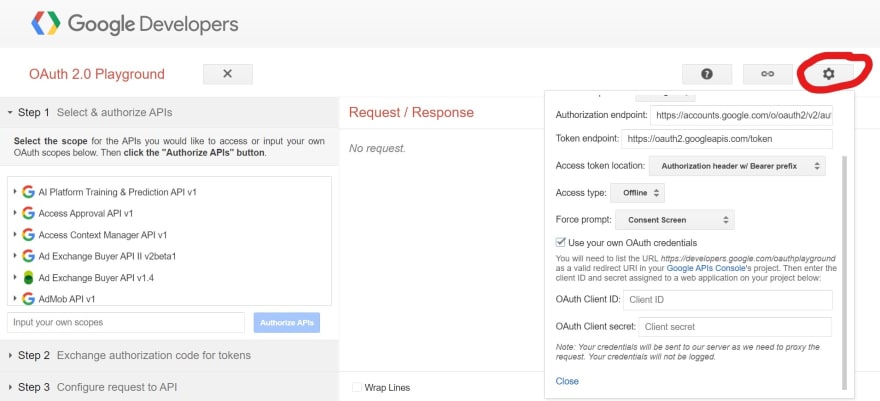
Start past visiting https://developers.google.com/oauthplayground.
Once on the page, click the gear icon and check the Use your own OAuth credentials box. And so paste in the client id and underground from before.
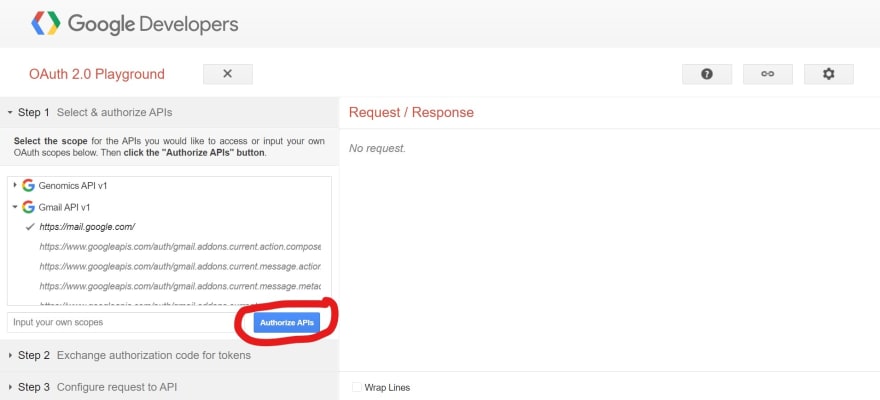
On the left, under the Select & authorize APIs section, find Gmail API v1 and select https://mail service.google.com/. Alternately, you lot tin also blazon https://mail.google.com/ into the Input your ain scopes field.
Now click Authorize APIs.
If the following pages announced, click permit so that Google OAuth ii.0 Playground has access to your Google account.
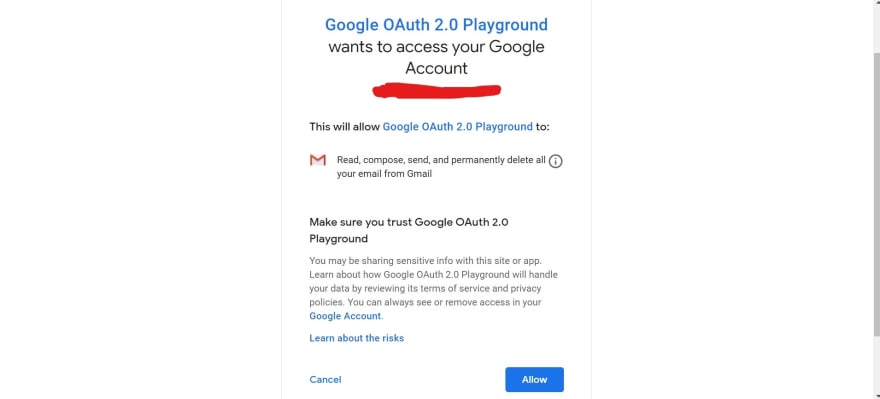
After being redirected dorsum to the OAuth 2.0 Playground,
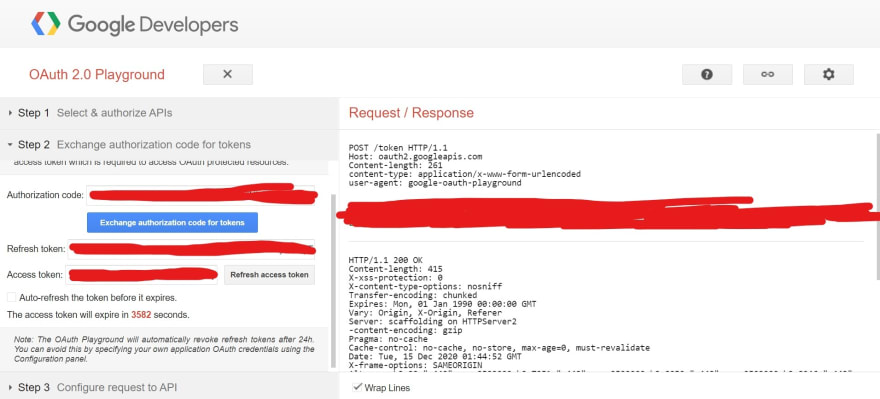
click the Substitution authorisation code for tokens push under the Commutation authorisation lawmaking for tokens section.
Once the refresh and admission token is generated, re-create the refresh token and relieve it for subsequently.
Step 4: Writing Code
Now that we have the client id, customer secret, and refresh token, we can now use them to send emails!
Start past making a new folder for the application and cd into the folder.
mkdir sendEmails cd sendEmails
To initialize the app as a node project, run npm init.
Adjacent, let'due south install the npm packages.
//Note: dotenv is a dev dependency npm i nodemailer googleapis && npm i dotenv --salve-dev
googleapis
- library for using Google APIs
- Will be used to dynamically generate admission token
dotenv
- library for using surround variables
- Will exist used to avert having API keys in our code
Like with any NPM packages, nosotros beginning by requiring the packages. And then, create an index.js file and add together the post-obit:
const nodemailer = require("nodemailer"); const { google } = require("googleapis"); const OAuth2 = google.auth.OAuth2;
Environs Variables Setup
Typically when using sensitive info in code (e.thou. API keys), the best practice is to use environment variables.
Create a .env file in the root directory of the project and add the following:
EMAIL=YOUR_GOOGLE_EMAIL_HERE REFRESH_TOKEN=PASTE_REFRESH_TOKEN_HERE CLIENT_SECRET=PASTE_CLIENT_SECRET_HERE CLIENT_ID=PASTE_CLIENT_ID_HERE
Now, we need to require and telephone call the config method before requiring all the packages:
require('dotenv').config(); const nodemailer = require("nodemailer"); const { google } = require("googleapis"); const OAuth2 = google.auth.OAuth2;
process.env now has the keys and values divers in the .env file. For case, we can access client id via process.env.CLIENT_ID
Creating a transporter
We beginning need to create an OAuth client with all of our info from before (customer ID, client hugger-mugger, and the OAuth Playground URL). The OAuth client will allow united states of america to dynamically create an access token from a refresh token.
"But wait, why can't we just use the admission token from the OAuth Playground? Or why are nosotros creating the access token dynamically?"
Well, if y'all noticed before, there was a bulletin indicating the access token would expire afterwards 3582 seconds.
The following code creates the OAuth customer and provides it with the refresh token:
const oauth2Client = new OAuth2( process.env.CLIENT_ID, procedure.env.CLIENT_SECRET, "https://developers.google.com/oauthplayground" ); oauth2Client.setCredentials({ refresh_token: procedure.env.REFRESH_TOKEN });
Since getting the access token through the OAuth client is an asynchronous process, we need to wrap the higher up in an async office.
const createTransporter = async () => { const oauth2Client = new OAuth2( process.env.CLIENT_ID, procedure.env.CLIENT_SECRET, "https://developers.google.com/oauthplayground" ); oauth2Client.setCredentials({ refresh_token: process.env.REFRESH_TOKEN }); };
Now, we can get the access token by calling the getAccessToken method.
const accessToken = look new Hope((resolve, decline) => { oauth2Client.getAccessToken((err, token) => { if (err) { pass up("Failed to create access token :("); } resolve(token); }); });
You might be wondering, why are we wrapping the getAccessToken method call in a promise? This is considering getAccessToken requires a callback and does not back up using async await. Thus, nosotros can either wrap it in a promise or create the transporter inside the callback. I prefer the former as it is more readable.
Now for the main function, creating the transporter object itself. To create it, we pass some configurations to the createTransport method.
const transporter = nodemailer.createTransport({ service: "gmail", auth: { blazon: "OAuth2", user: process.env.EMAIL, accessToken, clientId: process.env.CLIENT_ID, clientSecret: process.env.CLIENT_SECRET, refreshToken: process.env.REFRESH_TOKEN } });
Note: If you receive an "unauthorized client", endeavour adding the following to the JS object above.
tls: { rejectUnauthorized: imitation }
After the transporter is created, the completed createTransporter function should look like this:
const createTransporter = async () => { const oauth2Client = new OAuth2( process.env.CLIENT_ID, procedure.env.CLIENT_SECRET, "https://developers.google.com/oauthplayground" ); oauth2Client.setCredentials({ refresh_token: process.env.REFRESH_TOKEN }); const accessToken = await new Promise((resolve, reject) => { oauth2Client.getAccessToken((err, token) => { if (err) { refuse(); } resolve(token); }); }); const transporter = nodemailer.createTransport({ service: "gmail", auth: { type: "OAuth2", user: process.env.EMAIL, accessToken, clientId: process.env.CLIENT_ID, clientSecret: procedure.env.CLIENT_SECRET, refreshToken: process.env.REFRESH_TOKEN } }); return transporter; };
Detect we are returning the transporter instead of writing the code to send an email. We will create another function for sending the email for the sake of code readability and separations of concerns.
Let'due south at present create the sendEmail part. This function calls the createTransporter function and and so the sendMail method that exists on the transporter.
//emailOptions - who sends what to whom const sendEmail = async (emailOptions) => { let emailTransporter = await createTransporter(); expect emailTransporter.sendMail(emailOptions); };
All that is left at present is to send the electronic mail by calling the sendEmail role:
sendEmail({ subject: "Test", text: "I am sending an email from nodemailer!", to: "put_email_of_the_recipient", from: process.env.Email });
The consummate list of the e-mail options can be found at https://nodemailer.com/bulletin/.
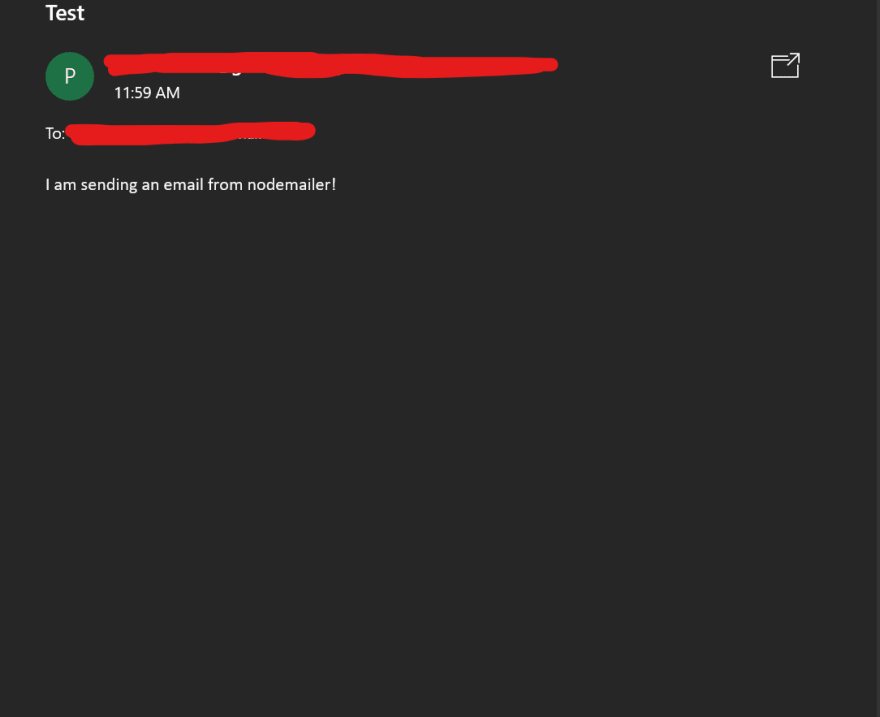
Run node index.js from the terminal/command line and Voila! Hither is the email we sent from the awarding!
For reference, here is the completed index.js file:
require("dotenv").config(); const nodemailer = require("nodemailer"); const { google } = require("googleapis"); const OAuth2 = google.auth.OAuth2; const createTransporter = async () => { const oauth2Client = new OAuth2( process.env.CLIENT_ID, process.env.CLIENT_SECRET, "https://developers.google.com/oauthplayground" ); oauth2Client.setCredentials({ refresh_token: process.env.REFRESH_TOKEN }); const accessToken = await new Promise((resolve, reject) => { oauth2Client.getAccessToken((err, token) => { if (err) { reject("Failed to create access token :("); } resolve(token); }); }); const transporter = nodemailer.createTransport({ service: "gmail", auth: { blazon: "OAuth2", user: process.env.Electronic mail, accessToken, clientId: process.env.CLIENT_ID, clientSecret: process.env.CLIENT_SECRET, refreshToken: procedure.env.REFRESH_TOKEN } }); return transporter; }; const sendEmail = async (emailOptions) => { let emailTransporter = expect createTransporter(); look emailTransporter.sendMail(emailOptions); }; sendEmail({ subject: "Exam", text: "I am sending an e-mail from nodemailer!", to: "put_email_of_the_recipient", from: process.env.E-mail });

What Service Does Reddit Use To Send Emails For Their Application?,
Source: https://dev.to/chandrapantachhetri/sending-emails-securely-using-node-js-nodemailer-smtp-gmail-and-oauth2-g3a
Posted by: hintonmillong1984.blogspot.com
0 Response to "What Service Does Reddit Use To Send Emails For Their Application?"
Post a Comment